DIY Unlaquered Brass Gallery Rail (on a budget!)
THE POPLAR COTTAGE
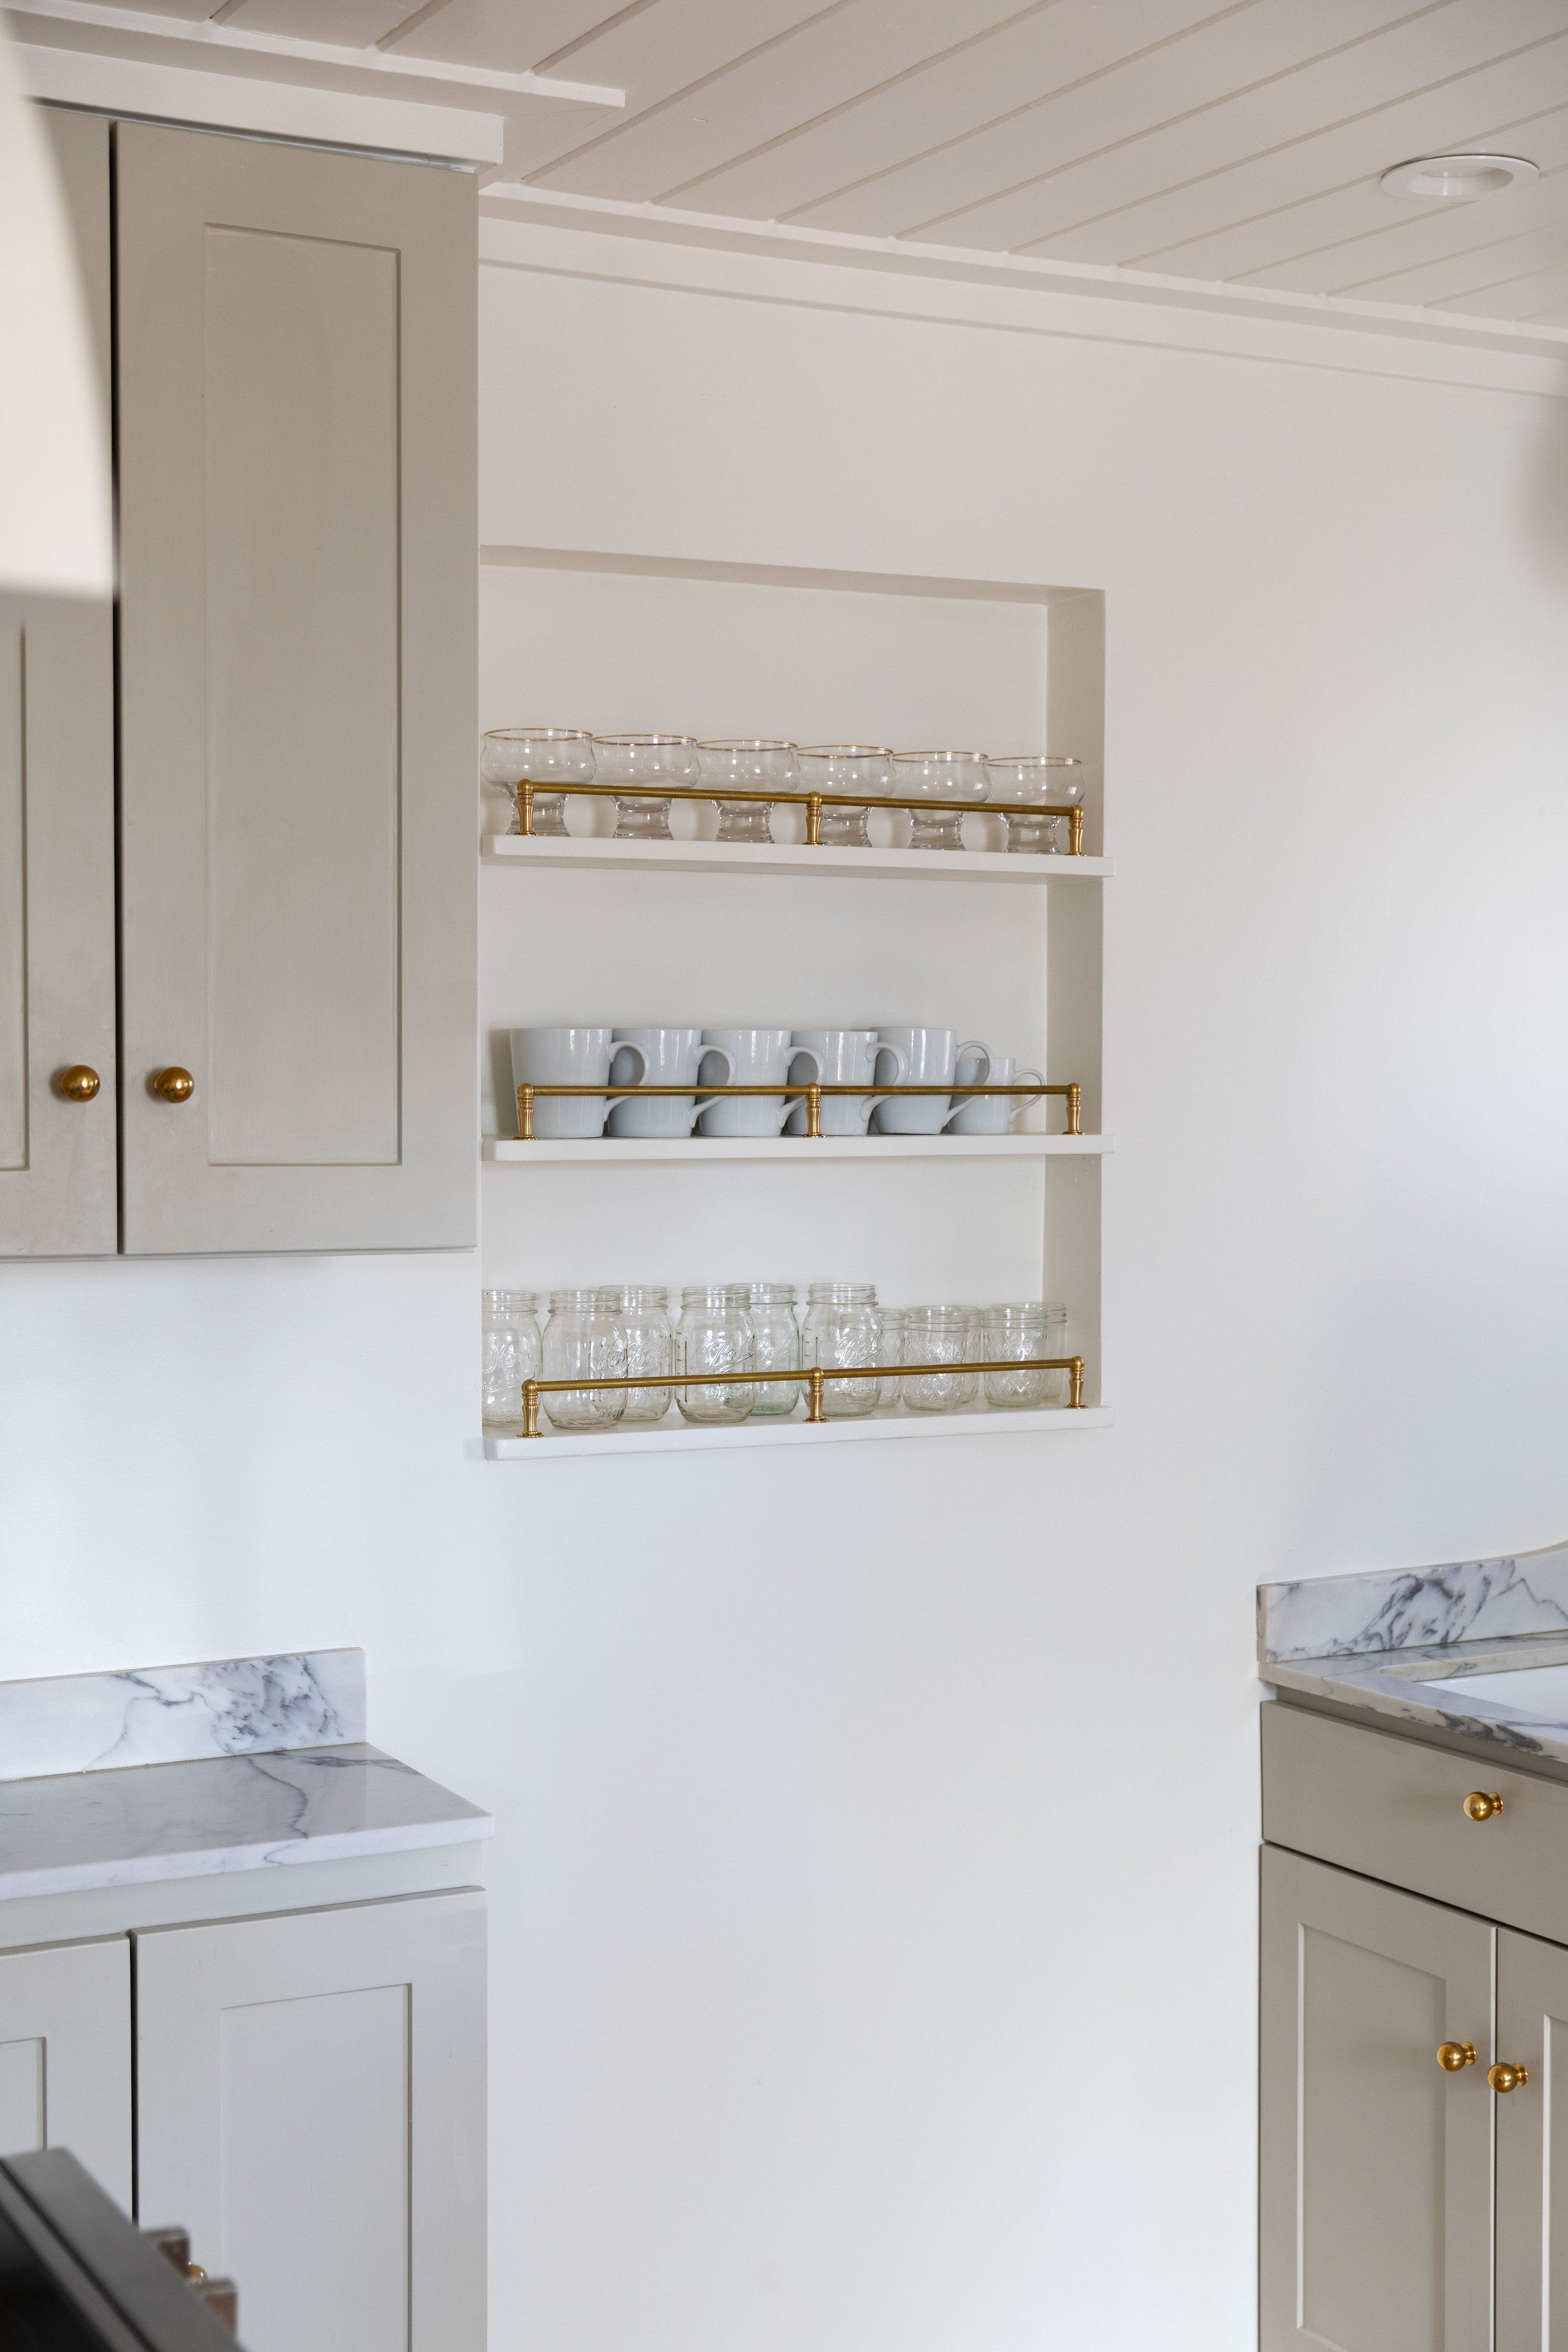
Is there anything prettier than brass gallery rail on a shelf? I’ve been dreaming of adding one of these to the Poplar Cottage kitchen for 4 years now and it’s finally time. After looking around online at options (and my jaw dropping at the price!), we decided to DIY our brass gallery rail. Today we’re sharing a how-to and all the sources for our easy-to-install, solid unlaquered brass gallery rail that cost under $25/shelf. Let’s get into it…

knobs (unlaquered), faucet, ceiling planking, quartz, cabinets FB Old White, walls BM Swiss Coffee


The secret to our brass rails…lamp parts! Yup, our unlaquered brass rods and posts are actually designed to be used in lamps. But they’re almost indistinguishable from the brass gallery rails I ogled online, so we’ll just keep it our little secret ;)
Metal finish
Our railing is solid unfinished brass, aka unlaquered brass. Unlacquered means the metal is uncoated and untreated, so the brass will age naturally and develop a one-of-a-kind patina over time. It’s my very favorite metal finish! Unlaquered brass never goes out of style and keeps getting better with age IMO. See an example of the aging process of unlaquered brass from our Farmhouse here.
These lamp parts look like they come in other finishes and you can search around on this website for nickel, antique brass, etc. Just be sure to keep the same sizing and threading for all your parts if you go that route!
DIY brass gallery rails
Materials and tools
brass gallery rail parts (see step 1 below)
Brass screws (we used these #3 brass screws but they were a little big - see note on step 2)
tape measure
pencil
cordless drill (we love this compact one!)
tiny flathead screw driver
Step 1 - measure & order pieces and parts
Start by measuring the overall length of your shelf, you want your railing to be no longer than this. Then it’s time to determine the length of your railing, which is a bit tricky, so consider drawing it out like we did below. Here are the parts we used and the way we calculated the length of the rail…

The lamp parts we used are as follows (ips stands for iron pipe size, the internal measurement of the pipe)…
Turned brass necks 1/8 ips - 5/8in x 1 1/2in (other shapes and heights here)
90 Degree Ball Armback - 1/8ips threaded - 7/8in x 5/8in
Tee Fitting Ball Armback 1/8ips threaded 5/8in
Male threaded flange 1/8ips (3/8in OD)
Rod with threaded ends 1/8ips threaded pipe with 3/16in threads on both ends. We used 12in long but they have lengths from 1.5” to 24”- just be sure to get 1/8ips with 3/16in threads on both ends
Note that the threaded rods screw about halfway into the ball armbacks if screwed in all the way. So when calculating the length of your brass rail, factor in an additional 1/16” for each center post. And for the end posts, factor in half the flange width plus 1/6” or just a little less (we used 9/16” for our flanges). That will get you close to the final length of the railing but allows for a little wiggle room.
For our 27” long shelf, we used two 12” rods, one center post, and two end posts and ended up with a total railing length of 25” from outside edge of flange to outside edge of flange.

Step 2 Assemble brass rail
A note here, at first our #3 brass screw heads wouldn’t sit flush cause the flange holes are too close to the brass necks, so we drilled out the flange holes using a regular cordless drill. If you do something similar, drill out the holes prior to assembling the entire rail. Otherwise, you could try getting smaller screws or getting brass necks with a narrower base.
Once your brass rail parts arrive, start by assembling them. I found it easiest to assemble the flange, neck, and ball armback and then add the rods. Do a test fit of the brass gallery rail on your self to get it positioned just right and make sure you like how everything looks. You can always unscrew the rods a bit to get a wider fit.
Hot tip: make sure the screw holes in the flange don’t line up exactly under your rod, otherwise install will be more difficult.

sweater, jeans, tank, earrings, watch
Step 3 Install railing
Once you’re happy with the location of each gallery rail, use your pencil to mark each hole in the flanges. Remove the gallery rail (making sure NOT to mix up which rail goes on which shelf if you’re doing multiple tiers like us) and predrill the holes. We used a 3/32 drill bit for our #3 screws, which was just right. Place the gallery rail back in place and install the screws using your small screw driver. We found this last step a little slow as the small screws and small, manual screw driver are tedious to use, but it was worth the effort.


And that’s it! An easy gallery rail.


Now for the fun part. Time to style your shelves! Or opt for function over form and fill them with everyday items (but pretty everyday items ;) like we did here.


Cost breakdown
I was shocked (shocked I tell ya!) when I saw how much the high-end brass gallery rails go for online. I got one quote for $450 for our project - that’s $150/shelf! - which just wasn’t in the budget. So I looked into DIYing. Plastic chess pieces felt too flimsy. Spray-painted wood just not quite the authentic brass feel I wanted. But when I saw people using solid brass lamp parts (like Lauren did here) I knew they would be perfect for us. Not only are they beautiful, but they should hold up for years and only cost a fraction of the designer rails. A win-win-win!
Here’s a look at the lamp parts invoice and total cost of this project…

Brass rail parts $64.20
Brass screws $8.19
Total = $72.39
That’s under $25/shelf! There might be a little shipping charge on the railing pieces and parts that I’m neglecting, but you get the idea. The railing I was ogling online cost me $450, so this is a savings of $378 - a total steal!

So thrilled with how these turned out!